8bitworkshop IDE#
Using the IDE#
To start the IDE, open https://8bitworkshop.com in your web browser and click Continue to 8bitworkshop IDE. For best results, use a recent version of Mozilla Firefox, Google Chrome, or Apple Safari.
Choosing a Platform#
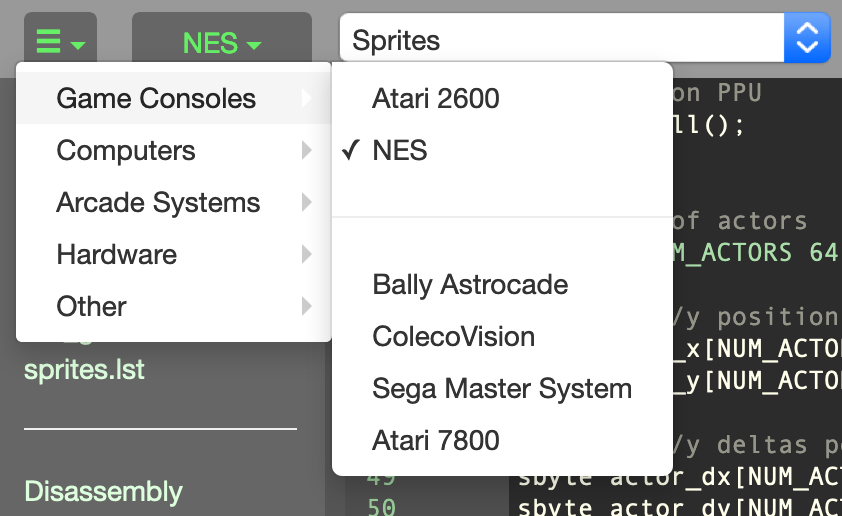
The 8bitworkshop IDE supports a number of different hardware platforms. You can switch between them using the pulldown to the right of the main menu.
Example Programs#
The IDE is packaged with several example programs for each platform. To the right of the menu icon, you can access a Project Selector drop-down menu that allows you to select a file to load.
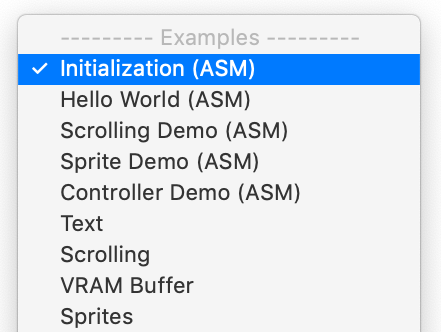
You can edit these files as much as you want — all changes are persisted in browser local storage and they’ll be there if you close the browser tab and come back. If you want to restore one of the example files back to its original condition, select File >> Revert to Original… from the menu.
To start from scratch, select New Project… from the menu. Type in
the name of your new file, typically with a .c extension for C source
files. You can also write 6502 assembler with the .asm extension.
Each platform has its own virtual file system in the browser, so any edits or new files will only be visible to the current platform.
Emulators#
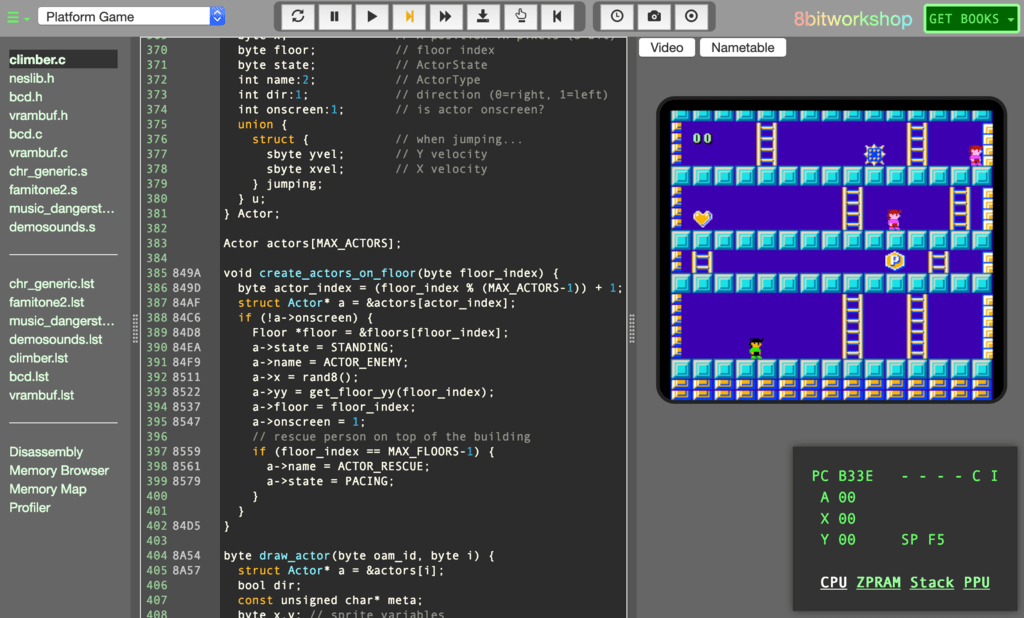
The IDE includes built-in emulators for all platforms, which run your code on simulated hardware. To control the game, first click the emulator screen to gain focus. The IDE will show the keyboard commands used by the current platform. Some platforms also support gamepads.
Compilers#
The IDE also includes C compilers and assemblers for most platforms. They run in the web browser, along with a web-based text editor. Each time you make a change to the code, it’s immediately compiled.
Any errors are displayed in a list in the upper-right corner of the page. To the left of each error is a link which you can click to go to the corresponding source code.
If there are no errors, the emulator is restarted with the new ROM image, allowing you to see code changes near-instantly.
Debugger#
The IDE includes a simple debugger which allows you to step through machine code instructions, view memory, and start and stop the program. The buttons at the top of the screen perform several debugging functions:

Reset: Hard reset the emulator, then single-step to the first instruction.
Pause: Stop the emulator.
Run: Resume the emulator after pausing.
Step: Execute the next CPU instruction, then break.
Next Frame/Interrupt: Execute until the next video frame starts, then break.
Run To Line: Set a on the current line (the one the cursor is on). The emulator will stop when execution reaches that instruction. You can also click on the gutter to the left of the line.
Step Out of Subroutine: Run until the current subroutine returns, then break.
Step Backwards: Step back a single CPU instruction.
These buttons may not be available on every platform:
Analyze Timing: This performs a flow analysis on your code, computing timing values for each instruction.
Show Help: Open a web page with more information on the selected platform.
Start Recording: Enable the replay feature, which lets you rewind the emulator, scrolling to arbitrary frames and CPU cycles.
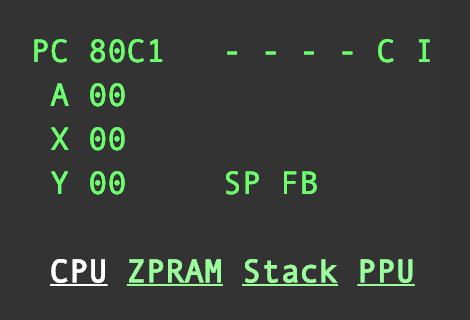
Whenever the IDE hits a breakpoint or is single-stepped, a debug window appears in the lower-right of the screen. This shows the internal state of the CPU, including all registers and flags. You can click the links at the bottom to see additional info.
Managing Files#
You can export and import files, share playable links and videos, sync projects to GitHub, and pull projects from GitHub.
Importing and Exporting Files#
If you plan to clear cookies or use different browsers or computers, you may need to export your work and import it.
To save your files outside of browser cache:
Select Download from the menu.
Choose an option:
Download Source File prompts you to download the active source file.
Download ROM Image prompts you to download the compiled — a file that contains the entire game and can be used in a standalone emulator.
Download Project as Zip prompts you to download the active project as a zip file.
Download All Changes as Zip prompts you to download all files included in the active platform.
When prompted, select a location on your computer and save the file.
To import source files back into the browser:
From the menu, select Upload, navigate to the source file on your computer when prompted, and click Open.
Syncing with GitHub#
You can now sync 8bitworkshop projects with GitHub source code repositories. From the 8bitworkshop IDE, you can import projects from GitHub repositories, publish your projects, and push/pull to/from GitHub repositories you have access to.
When you publish or push your projects to GitHub, 8bitworkshop pushes your code and a compiled ROM file to your repository.
To connect your GitHub account:
From the menu, select Sync >> Sign in to Github…
When prompted, enter your GitHub username and password.
To import a project from a GitHub repository:
From the menu, select Sync, then choose Import Project from Github…
In the pop-up that appears, enter the URL of the repository you want to use (in the format
https://github.com/username/reponame), then click Import Project.
To close the project and access other projects and files:
Select Leave Repository from the Project Selector drop-down.
To access the project later:
Select it from the Repositories section of the Project Selector drop-down.
To remove a GitHub repository from local storage:
Select the repository you want to delete from the Project Selector drop-down.
From the menu, select Sync >> Delete Local Repository.
Type YES when prompted to confirm deletion from local storage, then select OK.
To publish an 8bitworkshop project to a GitHub repository:
From the menu, select Sync, then choose Publish Project on GitHub…
When prompted, add a project name and description. The username will say “username”, after you connect to GitHub, this will change to your GitHub account name.
Choose the visibility of the published project by choosing Public or Private.
Select a license type.
Click Upload Project. If you’ve already logged into GitHub, the project will upload to GitHub. If not, you’ll be prompted to connect to GitHub and, after logging in, the project will upload.
To push changes to a GitHub repository:
From the menu, select Sync, then choose Push Changes to Repository…
When prompted, enter a commit message and then select Push Changes.
To pull changes from a GitHub repository:
From the menu, select Sync, then choose Pull Latest from Repository.
When prompted to pull from repository and replace all local files, select OK. Note that all local files will be overwritten; there is no merge capability via the browser.
Projects With Multiple Files#
A project can support multiple files. All files included in the project must be referenced in the main project file, with one of these reference types:
Include File - A source file embedded in another source file using an
#includeor similar directive.Linked File - A source file compiled/assembled and linked into the project alongside of the main file, using the
//#linkor;#linkdirective. A binary file can also be included into an assembly project using theincbindirective.Resource File - If a file needs to be included in the project, but is not included or linked from the main project (e.g. it may be included from a non-main file) then use the
//#resourceor;#resourcedirective to add it.
Here’s a C example:
//#link "lzg.c"
#include "lzg.h"
If a file cannot be found, check the syntax.
Often double quotes are required, e.g. #include "file.inc".
Only system files that are part of the compiler toolchain can be found with the <foo.h> syntax.
Assembler files can include files using the .include or .incbin directives:
.segment "CHARS"
.incbin "tileset.chr"
C Preprocessor Defines#
The preprocessor macro __MAIN__ is defined when compiling the main C file of a project.
You can use this to conveniently run tests on your module files, for example:
//#link "file_needed_for_test.c"
#ifdef __MAIN__
#include "file_needed_for_test.h"
void main() {
    test_my_module();
}
#endif
The macro __8BITWORKSHOP__ is defined on all C files.
CC65 Custom Config Files#
CC65’s linker is controlled with configuration files that define memory areas and the layout of the final binary or ROM.
You can tell the linker to use a custom config file in your main C program like so:
#define CFGFILE apple2-hgr2.cfg
//#resource "apple2-hgr2.cfg"
Note the lack of quotes in the first line.
CC65 #embed directive#
In 8bitworkshop 3.12 and above, you can include binary files directly into CC65 .c files, a feature not available from the CC65 command line.
For example, assume you’ve uploaded the binary file “image-c64.multi.lz4”. You can add the following to a .c file:
const char image_c64_multi_lz4[] = {
#embed "image-c64.multi.lz4"
};
This creates a byte array named image_c64_multi_lz4 with the contents of
your binary file.
SDCC #pragma#
With SDCC, you can enable additional compiler optimization by adding one of these lines to the top of the file:
#pragma opt_code_size  // for smaller code
#pragma opt_code_speed // for faster code
Adding either #pragma will result in slower builds, but faster and smaller code.
File Extensions#
The extension (or suffix) of your source file determines the tool used to assemble or compile it. Here’s a list of some common extensions:
Extension |
File Type |
Tool |
|---|---|---|
|
C source file |
cc65, sdcc, cmoc |
|
Assembler file |
ca65 |
|
Assembler file |
dasm (vcs) |
|
Assember file |
NESASM (nes) |
|
Assember file |
ZMAC (z80) |
|
Verilog file |
Verilator |
|
batariBASIC file |
batariBASIC (vcs) |
|
FastBASIC file |
FastBASIC (atari8) |
Embedding the IDE in a Web Page#
You can embed the 8bitworkshop IDE in a web page using an IFRAME element.
<iframe src="https://8bitworkshop.com/redir.html?embed=1&..."></iframe>
Here are the query string parameters:
Name |
Value |
|---|---|
embed |
must be “1” |
platform |
platform ID (i.e. “vcs”) |
file0_name |
name of main file |
file0_data |
text content of main file |
highlight |
(optional) line range to highlight (i.e. 2,4) |
The IDE will use browser storage tied to the referrer URL, so each page containing embeds will essentially be sandboxed from others.
Here’s an example using the Bootstrap library’s embed-responsive class:
<div class="embed-responsive embed-responsive-16by9">
    <iframe class="embed-responsive-item" loading="lazy"
        src="https://8bitworkshop.com/redir.html?embed=1&platform=nes&highlight=&file0_name=testembed.dasm&file0_data=..."></iframe>
</div>